
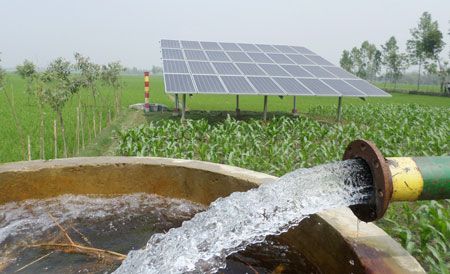
The pump is the heart of an irrigation system. Choose one that is too small and crops go thirsty. Choose one that is too big and you waste money on equipment and energy. Getting irrigation pump selection and installation right means matching the pump to the water source, the irrigation method and the field layout. This guide takes you step by step through the calculations, options and installation practices for farms of any size.
Step 1: Define the Water Requirement
Start with how much water the crop needs and how fast you must deliver it.
- Crop water need: depends on the crop, growth stage and climate. Typical peak crop water use in warm regions is around 4 to 8 mm per day. Local agronomy advice or crop water tables give figures for your crop and area.
- Irrigation efficiency: drip is commonly 85 to 90 percent efficient, sprinklers about 70 to 80 percent, and surface (furrow or flood) irrigation often 50 to 60 percent. Divide crop need by efficiency to get the water you must pump.
- Area and schedule: the area irrigated at one time and the hours per day of pumping.
Flow rate formula (cubic metres per hour):
Flow (m³/h) = Area (ha) × Net depth (mm) × 10 ÷ (Efficiency × Hours of pumping per day)
Example: 2 hectares of vegetables on drip irrigation, peak need of 6 mm per day, efficiency 0.9, pumping 6 hours a day:
2 × 6 × 10 ÷ (0.9 × 6) = 120 ÷ 5.4 ≈ 22 m³/h (about 6.2 litres per second).
Add a small allowance for filter flushing and growth, often 10 to 15 percent.
Step 2: Assess the Water Source
- River, dam or lake: surface pumps, with an intake screen and foot valve. Check seasonal level changes, and silt and debris loads.
- Borehole: a submersible pump or a solar submersible. You need the tested yield, static water level and drawdown. Never pump more than the sustainable yield.
- Shallow well: surface or jet pumps if the lift is small, or submersibles for deeper wells.
- Storage tank or reservoir: surface or booster pumps, often with a gravity-fed option if the tank is high.
- Water quality: sand, silt and salinity affect pump choice and filtration. Sandy water needs sand-tolerant pumps or filters. Check salinity for crops, and chemistry for pump materials. Obtain the water permit where required by the Water Resources Authority.
Step 3: Calculate Total Dynamic Head (TDH)
The pump must overcome all of these:
TDH = Static lift + Pumping drawdown + Friction losses + Pressure required at the field + Minor losses
- Static suction lift or well depth: vertical distance from the water level (when pumping) to the pump or to ground level.
- Static delivery head: vertical distance from the pump to the highest point of discharge.
- Friction losses: in pipes, fittings, valves and filters. Use pipe friction charts or the Hazen-Williams equation, and keep velocity in the pipe to roughly 1.5 to 2 m/s.
- Operating pressure: drip systems typically need about 1 to 2 bar (10 to 20 m of head) at the emitter plus filter losses. Sprinklers often need 2.5 to 4 bar at the nozzle. Rain guns and centre-pivots need more.
Example (continuing the drip case): water level 18 m below the pump, 5 m rise to the field, 8 m friction in pipes, 15 m operating pressure and 5 m for filters and fittings:
TDH ≈ 18 + 5 + 8 + 15 + 5 = 51 m.
Step 4: Calculate the Power Required
Hydraulic power (kW) = Flow (m³/h) × Head (m) × 0.00272
For 22 m³/h and 51 m: 22 × 51 × 0.00272 ≈ 3.05 kW hydraulic.
Then divide by the pump and motor efficiency (overall, perhaps 0.5 to 0.65 for small pumps) to get the electrical or engine power:
3.05 ÷ 0.55 ≈ 5.5 kW. Choose the next standard motor size above this, plus a margin if the manufacturer recommends it.
Always select the actual pump by reading its curve, to confirm that your flow and head fall near the best efficiency point (BEP) and that the motor is not overloaded across the operating range.
Step 5: Choose the Pump Type
| Pump type | Best for | Strengths | Limitations |
|---|---|---|---|
| Surface centrifugal (end-suction) | Rivers, dams, tanks, shallow wells | Simple, easy to service, wide range of sizes | Limited suction lift (a few metres), needs priming, prone to cavitation at high lift |
| Submersible borehole pump | Boreholes and deep wells | No suction problem, quiet, efficient at depth | Harder to retrieve for repair, motor cooled by water flow |
| Multistage surface or vertical turbine | High head or large flow | High pressure | Higher cost, more complex |
| Solar surface or submersible | Remote farms, daytime pumping | No fuel or grid needed, low running cost | Output varies with sunlight, upfront cost, needs storage tank |
| Engine-driven (diesel or petrol) | No grid power | Portable, flexible | Fuel cost, maintenance, noise |
| Jet or ejector pumps | Small domestic or garden use | Handle some suction lift | Low efficiency |
| Mono (progressive cavity) | Low flow, high head, sandy water | Handles sand and viscous fluids | Wears on abrasive water, needs dry-run protection |
For high-volume irrigation from a surface source, a centrifugal pump is usually the economic choice. For boreholes deeper than about 7 to 8 metres, submersibles are the norm. In sunny regions, solar pumping with a storage tank is increasingly attractive.
Step 6: Select the Power Source
- Grid electricity: lowest running cost where it is reliable. Three-phase supply suits larger motors. Check connection costs and tariff structure.
- Solar: direct-coupled solar pumping works well with a tank. Size the array for daily water volume and peak sun hours, and include the correct pump controller. EPRA-licensed installers should carry out the PV work.
- Diesel or petrol engines: useful for portable pumping, but fuel and maintenance costs are significant.
- Hybrid: solar plus grid or generator for reliability.
Variable frequency drives help match flow to changing field zones or reservoir levels, and soft starters reduce water hammer in long pipelines.
Step 7: Plan the Installation
Surface pump installation:
- Place the pump as close to the water and as low as practical to minimise suction lift.
- Use a suction pipe that is at least as large as the pump inlet, short, with no air pockets and a gradual rise to the pump. Fit an eccentric reducer with the flat side up.
- Fit a foot valve and strainer at the intake, kept off the bottom of the source and below the surface to avoid sand and vortices.
- Mount the pump on a solid, level concrete base, aligned with the motor or engine, with a coupling guard.
- On the discharge side, install a non-return valve, then an isolation valve and a pressure gauge. Add an air valve at high points on long pipelines.
- Provide shade or a pump house for protection from sun, rain and theft.
Submersible pump installation:
- Set the pump well below the lowest pumping water level, but above the bottom of the borehole to avoid silt, and never in the screened section if the manufacturer advises against it. Make sure that water passes the motor for cooling.
- Use a riser pipe with secure joints, a safety rope and a cable rated and sized for the current and length, strapped to the pipe at intervals.
- Fit a non-return valve above the pump and a sanitary well seal or cap.
- Install a control panel with overload, phase failure and dry-run protection, and a level probe or electrode.
- Pump a new borehole gently at first and clear the sand before running at full duty.
Pipework and fittings:
- Choose pipe material and pressure class for the maximum pressure plus surge. HDPE and uPVC are common for farm mains.
- Bury or protect pipes against UV, damage and temperature swings.
- Add filtration (screen, disc or sand) suited to your emitters. Drip systems need fine filtration.
- Add flow meters and pressure gauges to monitor performance.
- Include air release valves, drain points and thrust blocks at bends and ends of large pipes.
Step 8: Commissioning and Testing
- Check rotation direction, alignment and all connections.
- Prime surface pumps and vent air from the casing.
- Start against a nearly closed discharge valve, then open slowly to avoid surges.
- Record flow, pressure, current and voltage, and compare them with the pump curve.
- Listen for cavitation, air or unusual noise, and check for leaks.
- Test protection devices and the automatic controls.
- Flush the pipeline and filters before connecting emitters.
Step 9: Operate and Maintain
- Keep intake screens and filters clean.
- Check seals, lubrication and alignment on a schedule (see our pump maintenance checklist).
- Monitor current, flow and pressure for signs of wear or blockage.
- Drain and protect pumps and engines during long idle periods.
- Keep spare seals, fuses and a spare pump or motor for critical crops.
Common Mistakes on Farms
- Choosing a pump by horsepower alone, without checking flow and head at the duty point.
- Underestimating friction losses in long or small pipes.
- A suction pipe that is too long, small or leaky.
- No dry-run protection on borehole pumps.
- Over-pumping a borehole beyond its sustainable yield.
- Ignoring filtration, which clogs emitters and wears pumps.
Conclusion
Good irrigation pump selection and installation begins with the crop’s water requirement, converts it into flow and total head, and then matches a pump, power source and pipework to those numbers. Install the pump with a short, tight suction line or a correctly set submersible, protect it electrically, commission it carefully and maintain it regularly. The result is reliable irrigation at the lowest practical running cost.
Sources and Further Reading
- FAO, Irrigation and Drainage Paper 56, Crop Evapotranspiration: fao.org
- FAO, irrigation water management training manuals: fao.org
- Hydraulic Institute, pump selection and system curve guidance: pumps.org
- Water Resources Authority (WRA), Kenya, borehole and abstraction permits: wra.go.ke
- Raeli Hydro Engineering, “How Much Submersible Pumps for Boreholes in Kenya Cost on Average”: raelihydro.com
